 |
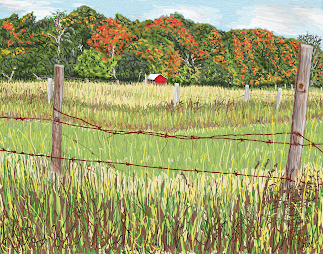
| Gaylord, Michigan (2022), Jon Patterson |
For a while now, I've been posting my brother's artwork that he masterfully accomplishes using Microsoft Paint 3D. It usually requires a tablet and stylus to adequately control the brush strokes using the tools. Unfortunately, the devices available to me are either PCs or Android tablets, so I will need to eventually purchase a MS Surface. Here's the latest painting by my brother. It was inspired by a Fall 2007 photograph my sister-in-law took in the northern part of the lower peninsula of Michigan. It's his third oil brush painting.
He did use the marker tool for very fine lines like the fencing in the background as the oil brush tool's smallest stroke width was too wide. He also used the watercolor brush to blend colors here and there. You'll find that it takes lots of practice to do blending with this tool.
So let's explore the modern world of digital painting! We'll start with a simpler portrait of a cat named Hopper using a photo from South County Cats that we use for PawsWithCause, the non-profit where I volunteer my time in retirement. When we sketch a shelter animal on a canvas for someone else to paint, we typically use Paint 3D to eliminate the background, isolating the animal itself. You may also use Photoshop to accomplish the same thing. This will allow you to lay down any shade you want (using the paint bucket tool) and then add details over it (sort of like underpainting).
My brother used Photoshop to make a transparent background with the cat at 40% opacity, and a second file has the cat at 100% opacity. Sometimes it's easier to color over if the subject is not so bold as 100% opacity. Hopefully at 40% opacity you can still make out the details, but you may also reference the original photo of your subject for the colors, shapes, and shading.
You'll have to overlay color to get a blended effect. But if you use the degree opacity -- which you can set for 7 of the 10 drawing tools -- you can sort of achieve a blended effect. Also, try different shades of a similar color to get the effect you want; i.e., make the overlay color have a hint of the "under" color by sliding along the rainbow color bar. I like the way the shag carpet came out in my background. Don't worry about getting every little detail purr-fect. You are allowed to edit. Since this is my first attempt, I tried nearly every type of brush (even the spray can) available with the tool.
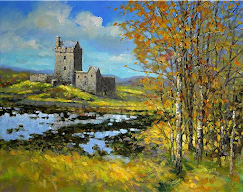 |
| Original Photo of a Painting |
Although I am still limping by with a mouse, I decided to jump right into a more complicated landscape. I chose one with lots of color and appropriately Autumn leaves. It was a photo of a painting that I supplied for inspiration during my recent Acrylic Landscapes class at Franke Tobey Jones' Senior University in Tacoma, WA. I decided to do my painting free-hand from this photo.
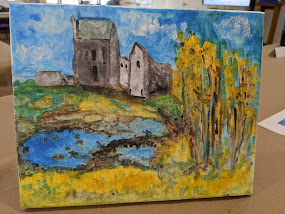 |
| Acrylic on Canvas |
And here's an interpretation done in acrylic on an 8"X10" canvas by one of my students. Note how she chose to make the castle the focus of her painting. She listened to my tips and tricks, used a modified color scheme, edited out the mountain, and created her own composition.
Let's get started with my Paint 3D version and set the size of our canvas. For an 11x14", set the height at 2200 pixels and the width at 2800 pixels. For an 8x10", set the height at 1920 pixels and the width at 2400 pixels. For a square design, it may be ~2500 x 2500 pixels. The higher the pixel number, the higher the resolution (and the bigger the file size). Since you set this in Paint 3D, for a Paint 3D PROJECT (and not an image you are importing), the numbers apply to the whole project (if that makes sense).
The first painting step is to lay down the zones of color in the background, using broad (20-50 pixel setting) brush strokes, to serve as our underpainting. My brother recommended using primarily the oil brush tool for this painting.
Mine is a bit more detailed because I wanted to leave a space for the clouds and castle shape. The trees will eventually show through to the background, so I extended the dark gray shape to the right. It may be important to write down the RGB color codes you choose in the event you want to return to them later (e.g. for the pond reflection). Of course, you can rely on your eyes for choosing colors.
Most of the rest of the painting can be done with the
oil brush set for
narrower strokes (25 pixels or less).
Experiment! Remember you can always hit the “
Undo” button if you don’t like it! The “
Undo” button can erase a seemingly unlimited number of previous strokes. While I was using a mouse, I noticed that I had to lift it up regularly, so that I didn't
Undo large areas. This is especially true when scribbling in the clouds!
I used the marker tool to begin playing with the trees. Since I don't have to wait for paint to dry, I am able to freely move around and add overlapping details. I did some of it with the watercolor brush and even tried the spray can tool on the shadowy grass in the foreground (in later steps).
This picture has lots of colors in it, so I chose multiple shades of yellow, orange, green, etc. And remember, when you’re in “yellow” mode, you can slide that
rainbow color bar toward orange if you want it more orange, or toward green if you want it more green. This is pretty much the final state of this painting. I like how my colors are brighter than the original. I probably could have made the grassy area in the foreground more vivid, but I was mainly playing with the tools.
Here's the final painting. Notice how the sky has been softened using a combination of watercolor strokes and the spray can tool. The horizon line has also been blended. I added in grass using the marker tool to give a bit more detail to the foreground. For my next challenge, I may try painting a dog.
Here's a kitschy painting of my 1-yr-old Shih Tzu masquerading as a Star Wars Wookie, Chewbacca. I call it Chewbailey.
Here she is dressed as an organ grinder's monkey. Her paws are raised above her head as if she's putting on the fez.
After hiking the Cedar Butte Trail in North Bend, I was inspired to capture the view from the top using my PC mouse in Paint 3D. Similar to the above landscape, I laid down bands of color for the sky using the oil brush. Then I worked on the purple mountain and the lower valley. After softening/blending the sky, I used the watercolor brush and spray can to create a sort of haze. I finished by drawing in the trees using a combination of the marker and other tools.


No comments:
Post a Comment
Do you have a favorite art movement or style? What's your favorite abstract artwork?